Quick Start Guide
This document aims to help you quickly get started with contributing to the Red Hat-based kernel projects including RHEL kernels, CentOS Stream kernels, and the Fedora/ARK kernel.
The target audience of this document is a Red Hat Kernel Developer or Partner Engineer.
Instructions for External Contributors will be provided in a separate document.
Looking for the FAQ?
Preparing to contribute for RHEL kernel
Configuring Bugzilla and GitLab accounts
-
Create and configure your Red Hat Bugzilla account.
-
Red Hat Developers must be a member of the
redhatbugzilla group to properly associate their account with GitLab. This group is used for Jira access and CVE access which still occurs in Bugzilla.
-
-
Create and configure your GitLab account per the Red Hat and GitLab Configuration Guide
-
Configure your SSH keys to your GitLab account.
-
Create a Personal Access Token (PAT) as a means or authentication for your GitLab account. This token is required to use any of the recommended public tools for kernel work.
-
-
Associate your Red Hat and GitLab accounts together: https://red.ht/GitLabSSO
This link should be used when starting fresh, or when common issues such as these occur:-
A contributor is experiencing difficulties such as (but not limited to) restricted access to repositories.
-
Pipelines not running.
🛈It is recommended to renew the SSO association on a regular basis (monthly or quarterly) as it can expire and cause unintended behavior.
This does not apply to External Contributors. Instructions are provided here.
-
Utilities
Install and configure your utilities for performing contributor and reviewer actions.
You can choose from:
-
Internal Tools:
-
rhstatus - Provides a terminal based report based on the current status of a developer’s TODO list and open Merge Requests.
-
-
External Tools:
-
revumatic - A review tool that provides a text user interface to review GitLab Merge Requests.
-
lab - Interact with repositories on GitLab (creating/editing Merge Requests, forking projects, etc.) via command line.
❗We recommend using the labutility to create forks and subsequent MRs to provide a consistent experience. Proceeding with this document assumes thatlabis configured.
-
Notable Red Hat projects
Creating a Jira ticket
-
Create ticket in the RHEL Jira project
-
Use Bug type for defects (that is, you are reporting an issue that exists in a currently supported RHEL release)
-
Use Story type for any new functionality, RFEs (that is, you are requesting functionality in a currently supported RHEL release)
-
Enter Summary, Component, Description
-
Set Affects Version(s). This is the version that the reported bug was seen in. Stories do not need to report an Affects Version(s).
-
Set Target Version. This is the version that bug should be fixed in, or that the feature is targeted for.
Setting Other Required Fields
This does not apply to External Contributors
-
Before ITM 26:
Set Fix Version/s (aka ITR), Docs Impact, Dev Target Milestone (aka DTM), and Internal Target Milestone (aka ITM or QE ITM) -
After ITM 26:
Same requirements, but alsoexception+orblocker+based on schedule.
Clone, fork and push
-
Clone the project you want to contribute to.
git clone <project_SSH_URL>-
RHEL9: According to the CentOS-Stream-9 Workflow document, use CentOS-Stream 9 like a normal RHEL git tree for all development work per the kernel workflow document. Working after ITM 26 may require additional considerations as specified for obtaining release approval as well as working on an internal RHEL-9 tree instead.
-
RHEL8: Use rhel8-tree like a normal RHEL git tree for all development work per the kernel workflow document.
-
Embargoed/NDA related content: Contact the relevant kernel maintainer.
❗For embargoed content or for content with non-disclosure agreements, you need to clone the project’s kernel-private tree directly. You cannot create your own fork from it, because your code would end up in a personal fork. This would increase the possibility of it leaking to the public.
-
-
Change directory to the project you cloned and use the lab utility to fork the project.
-
lab fork
Note that kernel repositories take a long time to fork.
-
-
Find the name of the fork.
-
git remote -v | grep <GitLab_username>
Note that GitLab username is used for the remote name.
-
-
Modify your fork while following the details outlined in Commit Rules Section 3: Commit-Specific Description Information
-
Push the updated branch to your kernel fork on GitLab.
-
git push -u <GitLab_fork_name> <branch_name>
-
Creating merge requests
Familiarize yourself with Commit Rules and Verify the MR information documents.
Creating a merge request draft
When done with your work, create a merge request (MR) on some branch other than the main branch.
git checkout -b <branch_name>
# do your work
git push -u <GitLab_username> <branch_name>
lab mr create --remove-source-branch --draft --force-linebreak [<origin>]
Note that the previous command produces a MR URL that contains a MR ID.
We strongly recommend that users of the lab utility use the --draft option to verify the changes pass the kernel project’s webhooks.
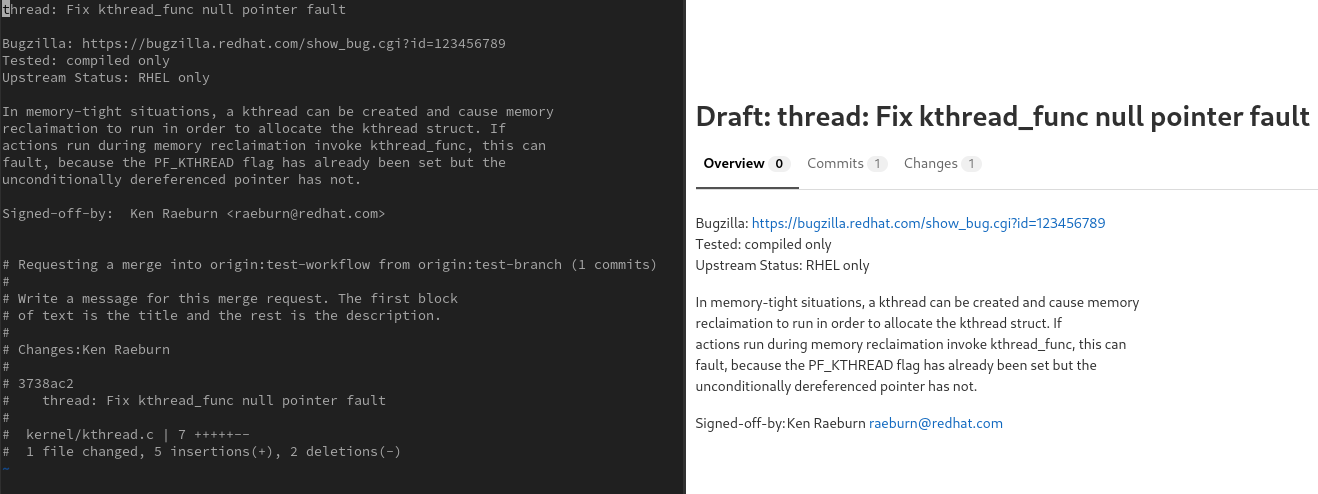
To achieve “optimal” formatting of the MR overview text, it is recommended that you use the --force-linebreak option with the lab utility.
Here are a couple of examples with the same input template
with --force-linebreak:

and without --force-linebreak:

Some tips
If you choose to use Markdown, some common formatting problems can be found and addressed in FAQ "I followed the commit rules as detailed, why do I have a red label that is seemingly satisfied?" and FAQ "The formatting is bad, how do I fix it?".
While editing the MR description, if you decide you don’t want to create it just yet, exiting the editor with a non-zero return value (e.g. vim’s :cq), or saving an empty file for the MR description will cause lab to abort the MR creation.
MR status
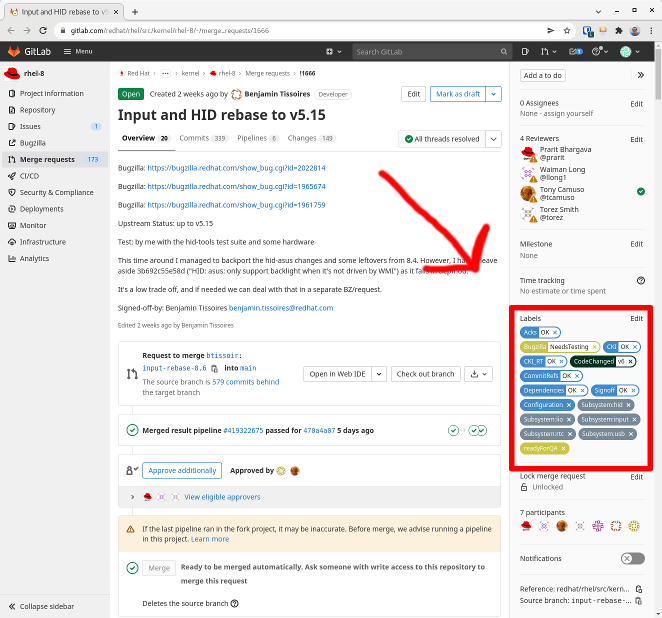
For a MR to be approved and subsequently merged, it must meet certain requirements. The label panel on the right shows the current status. For example:

Label Color Descriptions
| Color | Description | Example |
|---|---|---|
Red |
Unsatisfied or Failed requirement |

|
Blue |
Satisfied requirement |

|
Purple |
Irrelevant requirement (will not prevent a merge) |

|
Gray |
Informational, does not prevent a merge |

|
Goldenrod |
Follow up on merge request |

|
Dark Green |
Informational, Does not prevent a merge |

|
Light Green |
Proceed to next steps |

|
The full list of possible labels is available for reference.
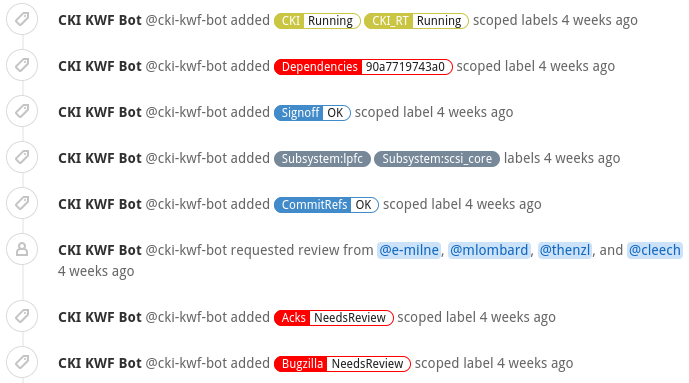
As various automated bot jobs run, different labels will be added or removed based on analysis of the MR or Jira or the results of tests performed:

If you don’t like the relative timestamps, they can be turned off (changed to date+time) in your GitLab preferences.
Jira ticket status
TBD.
|
🛈
|
If a CKI test fails, you should check CKI test debugging FAQ. If you’re new to CKI start at the generic guide which has further pointers. If you encounter a failed test that results in a new purple label “CKI_RT::Failed:merge”, this can be ignored. |
Submitting MR
-
Once your MR has passed the initial webhooks checks and is ready for review by others, move it out of
draftstate.
lab mr edit <mrID> --readyThree people need to ACK (or approve) this MR for it to pass. Direct action could be required to get people to provide their acks.
When MR is approved, it receives the
 label.
All approved MR’s, assuming they have the readyForMerge label, will normally be merged into the parent tree at the end of each week.
Performing additional operations on merge requests
Checking out and viewing
-
Get a list of MRs.
-
git fetch --all
lab mr list --all
-
-
Checkout the code from an MR.
-
git fetch --all
lab mr list --all# to find the mrID
lab mr checkout <mrID>
-
-
Get patches from an MR.
-
git fetch --all
lab mr checkout <mrID>
git-format-patch -<number_of_patches>-or-
-
git-format-patch origin/main
-
-
View the code without checkout.
-
lab mr show --patch
-
-
Show comments on an MR.
-
lab mr show <mrID> --comments
-
Performing actions
-
Comment on an MR.
-
Non-blocking
-
lab mr comment <mrID>
-
-
Blocking (NACK)
-
lab mr discussion <mrID> -
lab mr reply <mrID>:<comment_id>
-
-
-
Approve an MR.
-
lab mr approve <mrID>
-
-
Unapprove an MR (Rescind-Acked-by).
-
lab mr unapprove <mrID>
-
-
Close an MR.
-
lab mr close <mrID>
-
Appendix
Additional resources
Acronyms
Acronym |
Description |
ARK |
Always Ready Kernel |
C9S |
CentOS Stream 9 / CentOS 9 Stream |
CI |
Continuous Integration |
CKI |
Continuous Kernel Integration |
DTM |
Development Target Milestone |
EUS |
Extended Update Support |
FAQ |
Frequently Asked Questions |
ITM |
Internal Target Milestone |
ITR |
Internal Target Release |
KWF |
Kernel WorkFlow |
MR |
Merge Request |
MRs |
Merge Requests |
NACK |
No-Acknowledgment |
NDA |
Non-Disclosure Agreement |
PAT |
Personal Access Token (an API key to use for tools with GitLab) |
RHEL |
Red Hat Enterprise Linux |
SSO |
Single Sign-On |